27 Genius Small Bathroom Remodel Ideas to Maximize Your Space
Remodeling a small bathroom presents unique challenges, but limited square footage doesn’t have to limit your style or functionality.
With thoughtful planning and strategic design choices, even the tiniest bathroom can feel spacious and luxurious.
Smart layout decisions, multi-functional fixtures, and clever storage solutions can transform your cramped bathroom into an efficient retreat.
The key lies in maximizing every inch without overcrowding the space.
Ready to make your small bathroom feel twice its size?
These 27 remodeling ideas will help you create a bathroom that combines style, function, and comfort—regardless of its dimensions.
1: Floating Vanity Installation

Mount your vanity to the wall instead of the floor to create the illusion of more space. The visible floor area underneath makes the entire room feel more open and airy.
Choose a model with drawers or shelving to maintain adequate storage capacity.
The clean lines and shadow gap beneath create contemporary appeal while serving practical purposes.
This simple change dramatically affects how spacious your bathroom feels without sacrificing functionality.
2: Large-Format Tile Strategy

Install oversized tiles to reduce visual clutter and make your bathroom feel larger.
Fewer grout lines create a more seamless appearance that visually expands the space.
Extend the same tile from floor to walls for continuity that eliminates visual breaks.
Choose light colors for maximum space-enhancing effects, or go bold for dramatic impact.
This designer trick creates the illusion of expanded dimensions without moving any walls.
3: Frameless Glass Shower Doors

Replace shower curtains or framed doors with frameless glass panels that visually open up the entire bathroom.
These transparent dividers maintain shower functionality without visual barriers.
The uninterrupted sightline makes your bathroom appear larger and more cohesive.
Light passes freely through the space, enhancing brightness and the sense of openness.
This upgrade instantly modernizes your bathroom while creating the perception of expanded square footage.
4: Strategic Mirror Placement
Install an oversized mirror or multiple mirrors to visually double your bathroom’s dimensions.
This classic design trick bounces light around the room while creating the illusion of depth.
Consider extending the mirror wall-to-wall above your vanity for maximum impact.
Position mirrors to reflect natural light sources or attractive features for multiplied benefits.
This relatively affordable upgrade delivers dramatic results in perceived spaciousness.
5: Wall-Mounted Toilet Selection

Upgrade to a wall-hung toilet with a concealed tank to reclaim valuable floor space.
These space-saving fixtures mount directly to the wall, hiding the bulky tank inside your wall.
The floating effect creates a more open feeling while making floor cleaning easier.
Modern models offer water-saving features and sleek profiles for contemporary appeal.
This European-inspired choice can free up to 9 inches of floor space in your bathroom footprint.
6: Curb less Shower Conversion

Remove the traditional shower curb to create a seamless floor that visually expands your bathroom.
This elegant solution eliminates visual barriers while creating a contemporary look.
Proper waterproofing and subtle floor sloping direct water to the drain without spillage.
The continuous flooring creates an uninterrupted sightline that makes the space feel larger.
This luxurious upgrade improves accessibility while delivering high-end aesthetic appeal.
7: Pocket Door Installation

Replace swinging doors with space-saving pocket doors that slide into the wall. This simple change reclaims the floor space normally reserved for door clearance.
Choose frosted glass options to maintain privacy while allowing light transmission. The streamlined operation eliminates awkward door maneuvering in tight spaces.
This practical modification can recover up to 10 square feet of usable bathroom space.
8: Vertical Storage Utilization

Maximize underused wall height with tall, narrow storage units that occupy minimal floor space.
These vertical solutions provide ample storage without consuming precious square footage.
Install floating shelves above the toilet or doorway for decorative and functional storage.
Consider custom floor-to-ceiling cabinets in unused corners for maximum capacity.
This upward focus keeps necessities accessible while maintaining open floor areas for movement.
9: Niche Creation Strategy

Carve recessed niches into shower and bath walls for product storage without protruding shelves.
These inset compartments provide convenient access without consuming shower space.
Illuminate with small LED lights for both practical use and ambiance. Tile with accent materials to create decorative features from functional necessities.
This architectural detail adds character while keeping shampoo bottles and soaps neatly contained.
10: Monochromatic Color Scheme

Create visual continuity with a single-color palette that eliminates jarring transitions.
This design approach makes small spaces feel more expansive and cohesive.
Choose varying shades and textures within the same color family for depth without division.
Light colors naturally expand spaces, while darker tones create sophisticated intimacy.
This designer technique creates harmony that allows your eye to move smoothly throughout the space.
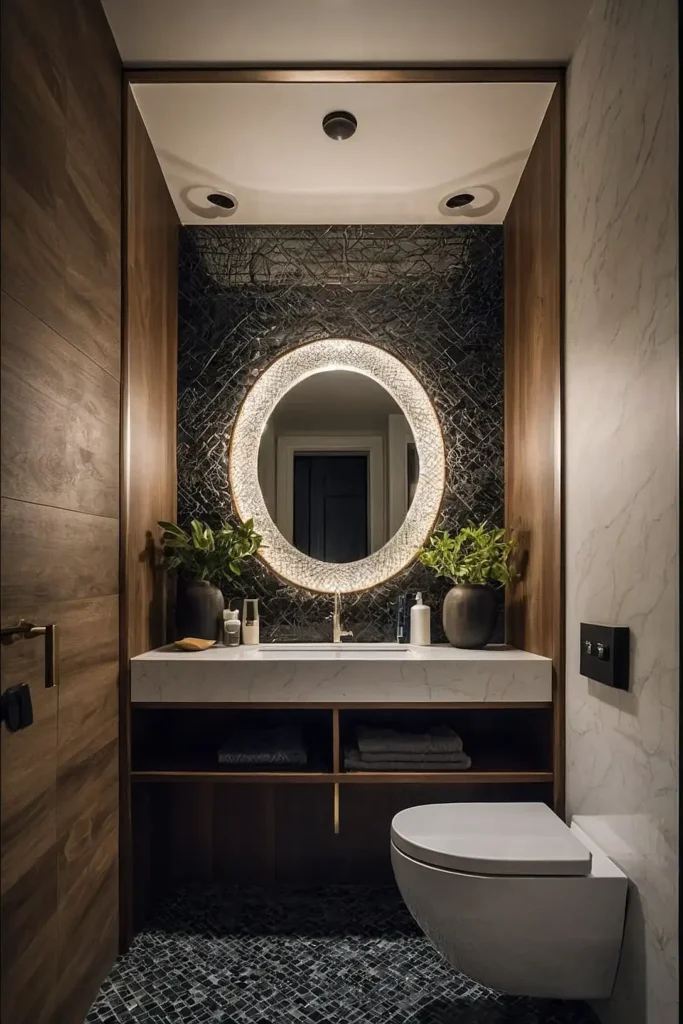
11: Backlit Mirror Installation

Integrate LED lighting behind your mirror to create ambient illumination without additional fixtures.
This space-saving solution serves both practical and aesthetic purposes.
The soft glow eliminates harsh shadows while adding a luxury hotel feeling.
The frameless floating effect adds contemporary sophistication to your bathroom design.
This dual-purpose element combines essential functions without consuming additional wall space.
12: Corner Sink Optimization

Reclaim wasted corner space with specially designed corner sinks that fit snugly where rectangular models won’t.
These space-saving fixtures free up valuable traffic flow areas.
Choose models with small integrated countertops for essential items. Pair with wall-mounted faucets to maximize the available surface area for toiletries.
This strategic choice improves maneuverability in tight bathrooms while maintaining full functionality.
13: Sliding Shower Screen

Install a single sliding glass panel instead of swinging doors or curtains that intrude into your bathroom space.
This streamlined solution contains shower spray without sacrificing square footage.
The minimalist track system requires minimal hardware for clean lines. The panel slides parallel to the wall, eliminating clearance requirements for door swings.
This contemporary approach maximizes your usable floor area while providing necessary water containment.
14: Towel Warmer Integration

Replace standard towel bars with heated towel warmers that serve multiple functions.
These efficient fixtures dry towels quickly, reducing humidity while providing luxury comfort.
Ladder-style models offer more hanging capacity in the same wall footprint.
The increased functionality justifies the wall space allocation for enhanced daily experience.
This practical upgrade combines necessary towel storage with spa-like amenities in one footprint.
15: Continuous Floor Selection

Extend the same flooring from hallways into your bathroom to create visual flow between spaces.
This seamless transition makes your bathroom feel like part of a larger area.
Choose waterproof luxury vinyl or porcelain tile for practical performance.
The uninterrupted flooring eliminates threshold transitions that visually segment spaces.
This design technique borrows perceived space from adjacent areas for a more expansive feeling.
16: Glass Partition Focus

Replace solid walls with glass partitions where privacy permits to open sightlines within the bathroom.
These transparent dividers maintain functional separation without visual heaviness.
Use frosted or textured glass for shower areas requiring more privacy.
The light transmission through glass brightens the entire space while maintaining functional zones.
This architectural approach completely transforms how spacious your bathroom feels.
17: Pedestal Sink Consideration

Swap bulky vanities for sleek pedestal sinks in extremely tight spaces. These classic fixtures occupy minimal floor space while maintaining full sink functionality.
Compensate for lost storage with medicine cabinets or nearby shelving units. The exposed floor area creates a more open feeling despite the small dimensions.
This traditional solution works particularly well in powder rooms or secondary bathrooms with limited storage needs.
18: Recessed Medicine Cabinet Upgrade

Replace surface-mounted medicine cabinets with recessed models that sit flush with your wall.
This space-saving solution provides storage without protruding into the room.
Choose models with mirrored interiors to amplify light and visibility.
Many contemporary options include integrated lighting and electrical outlets for additional functionality.
This practical storage solution disappears into your wall rather than competing for limited bathroom space.
19: Shower Bench Incorporation

Build a small bench into your shower area that serves multiple functions in limited space.
This thoughtful addition provides seating, leg-shaving convenience, and extra storage.
Position at the shower end to double as a mounting point for fixtures and controls. Add a slight slope and waterproofing to prevent water pooling on the surface.
This multifunctional element enhances your shower experience without requiring additional square footage.
20: Vessel Sink Selection

Install a vessel sink that sits atop your counter rather than being inset to create more usable cabinet space below.
These distinctive fixtures combine style with practicality.
The raised design allows for a shallower vanity cabinet with full storage capacity.
Choose sleek, simple shapes that complement your bathroom’s scale without overwhelming it.
This stylish option maximizes cabinet interior space while creating a design focal point.
21: Light-Maximizing Window Treatments

Replace heavy window coverings with light-filtering solutions that maintain privacy while maximizing natural illumination.
Brighter spaces inherently feel larger and more open.
Consider frosted window film that provides privacy without blocking light.
Top-down/bottom-up shades allow light through the top while maintaining lower privacy.
This bright approach enhances your bathroom’s atmosphere while visually expanding its dimensions.
22: Diagonal Tile Layout

Install floor tiles on a diagonal (45-degree angle) rather than parallel to the walls to create the illusion of a larger space.
This simple rotation tricks the eye into perceiving expanded dimensions.
The diagonal lines lead your eye across greater distances, making the room feel wider. This technique works with square or rectangular tiles of any size or material.
This installation method costs no more than standard layouts while delivering significant visual benefits.
23: Accent Wall Creation

Paint or tile a single wall in a distinctive material or color to add depth and interest to your small bathroom.
This focused approach adds character without overwhelming the space.
Choose the wall behind your vanity or toilet for maximum impact. The strategic contrast creates a focal point while the remaining neutral walls recede visually.
This designer technique delivers dramatic style with minimal materials and cost.
24: Wall-Mounted Faucet Installation

Free up precious sink space by mounting faucets directly to the wall above rather than on the sink or counter.
This space-saving solution creates more usable surface area.
Position 4-8 inches above your sink for comfortable hand-washing clearance. The streamlined appearance contributes to a more contemporary, minimalist aesthetic.
This practical modification increases usable counter space while adding architectural interest.
25: Skylight Consideration

Install a small skylight to flood your bathroom with natural light from above without sacrificing wall space.
This architectural feature dramatically transforms small, dark bathrooms.
Choose models with built-in ventilation capabilities for dual functionality. The increased light makes your bathroom feel significantly more spacious and airy.
This more substantial renovation delivers transformative results worth the investment.
26: Textural Contrast Focus

Create visual interest through textural variations rather than busy patterns that can overwhelm small spaces. This designer approach adds depth without visual clutter.
Combine matte and glossy finishes, smooth and textured surfaces, or hard and soft materials.
The subtle variations create sophisticated interest without competing for visual attention.
This refined strategy adds complexity and character while maintaining a spacious feeling.
27: Smart Storage Accessories

Integrate specialized organizational accessories into existing cabinets and drawers to maximize their storage capacity.
These internal improvements multiply functionality without expanding footprints.
Install drawer dividers, pull-out shelves, and vertical separators for efficient organization.
Add over-door hooks, magnetic strips, or tension rods for additional storage opportunities.
These hidden solutions keep necessities accessible and organized while maintaining clean, uncluttered surfaces.
Conclusion
Your small bathroom holds tremendous potential for both style and function.
By implementing these space-maximizing ideas strategically, you’ll create a bathroom that feels surprisingly spacious while reflecting your personal style and meeting your practical needs.